Showing posts with label Pumpkin. Show all posts

Monday, October 7, 2013

Better than Starbuck's Pumpkin Latte

Better Than Starbuck's Pumpkin Latte (and it is not because it contains Jack Daniels, because it doesn't)

To celebrate the fall season, I'll be featuring pear and pumpkin recipes that will be tasty and easy to make like this Pumpkin Latte. Unlike Starbuck's Pumpkin Spice Latte, this one is lower in calories, will save you money, and there are no hidden ingredients to make this delicious latte. The best part, this recipe does not contain any animal-fat because it is dairy-free and vegan.

Ingredients for Pumpkin Latte

  • 1/4 cup Strong Coffee (I used 1/4 cup water and 1 tablespoon of instant coffee)
  • 2 cups Almond Milk (or soy)
  • 4 tablespoons Pumpkin Puree
  • 3 tablespoons Maple Syrup
  • 1/4 teaspoon Pumpkin Spice*
  • 1/2 teaspoon Vanilla Extract

Ingredients for Pumpkin Spice (I didn't have any so I made my own blend)
  • 1 tablespoon Cinnamon
  • 1 teaspoon Ginger
  • 1 teaspoon Nutmeg
  • 1/2 teaspoon Clove
  • 1/4 teaspoon Cardamon (or All Spice)

The Fancy Method

  1. In a medium saucepan on medium heat, combine coffee, milk, maple syrup, and pumpkin puree together with a whisk. Cook mixture until hot but don't allow mixture to boil.
  2. Remove from heat and add vanilla extract, and spices. 
  3. Stir and let spices infuse latte for a couple of minutes. Strain spices out with a strainer or cheese cloth. This will make your latte smooth and not gritty from the spices. 
  4. Pour into mugs and stir with cinnamon stick if desired.  

The Low Maintenance Method

  1. In a large mason jar, add all liquids together except for vanilla extract. Cap the jar and give it a few good shakes to mix the ingredients together. 
  2. Uncap the mason jar and heat the mixture at 30 second intervals in the microwave until it is hot. Mix mixture in between the 30 seconds intervals with a whisk or cap the mason jar and give it a few good shakes. 
    • Tip: Use a wet towel to uncap the mason jar before heating it in the microwave. A vacuum seal is created because the mixture is hot so be careful when unscrewing the lid. 
  3. Once hot, add vanilla extract and spices. Mix or shake the latte. Shaking it is more fun though. 
  4. Enjoy! 
*Tip: I've put all the ingredients in a mason jar except for the spices the night before. When morning arrives, I give the jar a few good shakes to mix the ingredients, uncap the jar, heat the liquid in the microwave, add the spices, then cap the jar and go. It can be as simple as that!

Monday, November 26, 2012

The New Favorite: Purple Yam Chiffon Cake!

In my last post, no one shared a food they enjoy or would like to see in this blog :(. Don't be shy to share your favorite baked dessert or savory dish with me. I want to get to know you, and what you like to eat. You can share your go to comfort food, snack, dessert here.

I was inspired to make this cake because my dear friend Christine gave me lots of purple yams when she came to visit me a couple weeks ago. If you haven't had purple yams before, you must! You'll be blown away when you taste them since they are naturally super sweet like candy. Only buy small sized yams though. The big ones are not very sweet and spoils easily.

What is Chiffon Cake? Chiffon cake is a simple cake made from four base ingredients,  oil, eggs, sugar, and flour. Leavening agents such as baking soda and powder is not used or needed to create volume because whipped eggs are the leavening agents. In order for eggs to maintain is volume, sugar is needed to stabilize and to create structure in the whipped eggs.

Taste: As you have guessed, this chiffon cake is unlike any other because it contains purple yam, making it sweet and tasty.

Texture: This cake is light and fluffy from air whipped into the eggs. When I pressed down on the cake to flatten, it bounced back up. This chiffon cake has great volume but less compared to those made of cake flour.

My Results: I am very happy with my purple yam chiffon cake but I have room to improve. The top of my cake deflated a little, making it dense compared to the rest of the cake (in the photo, the top of the cake is the bottom because I flipped the cake upside down). It was still tasty but I want the same volume throughout the cake. The color of my cake did not come out purplish pink but bluish-grey. I believe the color of my cake was due to the quality of  my yams. I used large yams and they didn't have the super dark rich purple color as the small ones.

Modification: I used whole wheat pastry flour instead of cake flour, and I decrease the amount of sugar because purple yams are very sweet. When I make this next time, I will use less sugar and use small sized yams since they are sweeter, more flavorful, and has a richer purple color. I adjusted the amount of eggs used to make it easier for people like me who don't want to weigh the amount of eggs needed.
Ingredients to make an 8" cake
This recipe is inspired from a recipe by Noriko Ozawa.

90 grams mashed purple yam*
5 egg yolks
oil
water
12 grams lemon juice
80 grams whole wheat pastry flour

5 egg whites
80 grams (1/3 cup + 2 teaspoons) sugar
10 grams cornstarch

*choose small purple yams to make this cake.

Method
1. Wash and wrap the purple yams in foil. Bake at 350F for 30-45minutes or until fully baked. Too check for doneness, slide a knife into the center of the yam. The knife should slide easily in and out. Slice the yam in half. The yam should be moist and have a dark rich purple color. If it doesn't, it might not be fully cooked.  If it appears dry and there is not much color, the yam may be not good. Once cooked, mash the yams well.

2. Preheat oven to 325F.  Use a tubed shaped cake pan. There is no need to grease the tube pan. You can use a ceramic dish or cake pan but the cake will deflate a bit and not have as great of volume. Prepare the ceramic dish or pan by lightly greasing the bottom or line it with parchment paper.

3. In a medium bowl, sieve flour. Set aside.

4. Place egg yolks, water, and the mashed sweet potato in a mixing bowl. Whisk the mixture to combine. The color of the batter will not be purple.

5. Add the oil and stir to combine. Now add the lemon juice and stir to combine. The lemon juice will bring color back to the mixture. It may be a pink color. Sieve the flour into the wet mixture and whisk until it is fully incorporated. The mixture should be smooth. Add the small amount of sugar. Stir to combine.

6. In a clean dry bowl, beat the egg whites with an electric mixer on the lowest speed. Once it becomes frothy and foamy, turn the speed on high and add the sugar to the whites gradually. Add 1 tablespoon of sugar at a time. Before adding the last tablespoon of sugar to the egg whites, combine it with the cornstarch. Beat the egg whites until the whites appear smooth and glossy. When the whisk is lifted up, the peak of the whites will curl and droop slightly.

- Something wrong happened to  my egg whites when I added the cornstarch became it became more like a batter. I beat my whites with the whisk until I reached a ribbom stage. That is when I could draw an 8 with the batter. The 8 would disappear after a few seconds.

7. To combine the two mixtures together, add the egg whites into the yam batter in three different parts. First, add a third of the whites into the yam batter. Use a spatula to fold the batters together. Do this by cutting through the center of the batter and lifting the bottom of the batter to the top. Turn the bowl a quarter turn after each fold to evenly blend the two mixtures together. When the whites are combined with the yam batter, add half of the remaining eggs white, and use the folding method to combine.  Repeat this method with the remaining whites.

8. Pour batter into pan and lightly tap it against the counter to release unstable air bubbles. Bake in a pre-heated oven at 325F for 45 minutes. I tinted my cake so the top won't burn. I could have let the top browned a bit more though. if a skewer comes out clean after being inserted into the center of the cake, it is done.

9. Remove the cake from the oven and let it cool upside down. By cooling it upside down, the springy texture of the cake is maintained. This isn't possible if it is baked in a ceramic pan. Unmound cake after its cooled.

10. Remove the cake by running a thin knife around the side and center of the tubed pan. If your cake pan does not have a removable bottom. Try to loosen the bottom of the cake with a thin spatula. With the removable bottom tubed ban, push bottom to separate the two pan pieces. Then run knife between the pan and bottom of the cake. Flip cake over to a serving plate and enjoy.

Thursday, November 15, 2012

Sugar-free Pumpkin Bread

This quick bread is inspired by all the unhealthy pumpkin bread recipes I saw online and in recipe books. Almost all recipes I found for pumpkin bread uses approximately ONE CUP OF SUGAR for EVERY CUP OF FLOUR. That is way too much sugar for anyone to consume in bread. I came up with this sweet pumpkin bread that only requires 1/3 cup of honey for every cup of wholesome whole wheat flour. This bread can be enjoyed all year round since it is not heavy in spices. Just freeze it to store,  and when you are ready to enjoy it, pop it in toaster-over or oven.
If you are not accustomed to the nutty flavor of whole wheat flour, swap half of the flour for unbleached organic all purpose flour.

Taste: This pumpkin bread is sweet from the use of only a third cup of honey for two small loves. The smell of cinnamon goes well with the plump and juicy raisins and crunchy walnuts.

Texture: This bread is very tender and moist. It has good structure and will not fall apart when handling upon cooling.

Ingredients to make 2 small loaves (approx: 5 ½" x 3" x 2 ¼")
½ cup (70 grams) Whole Wheat Flour*
½ cup (80 grams) Whole Wheat Pastry Flour*
½ teaspoon Baking Soda
⅛ teaspoon Baking Powder
¼ teaspoon Salt
1 teaspoon Cinnamon
1 cup (225 grams) Pumpkin (pureed or can)
 Oil*
½ teaspoon Vanilla Extract
1 Egg
⅓ cup Honey
Soaked Raisins (Soaked for at least an hour)
½ cup Chopped Walnuts
½ cup Chocolate Chips (optional, bread will not be sugar free if this is used)

Flour*: If you don't have pastry flour, you can use 1 cup of Whole Wheat Flour. Using regular whole wheat flour will give you a hardier bread with a more nutty flavor. If you use flour made with White Wheat, it will be softer and less nutty in flavor. You can find 100% Whole White Wheat flour at Trader Joe's, Wegmans, Walmart and even Target.

Oil*: Use any type of vegetable oil. I used Trader Joe's pressed sunflower oil. Don't use olive oil, your bread will have a strong olive flavor that will not taste good with the other flavors in the bread.

Method
1. Line bottom of loaf pans with parchment paper. Preheat oven to 350F.

2. With a whisk, mix dry ingredients together in a clean bowl (whole wheat pastry flour, whole wheat flour, baking soda, baking powder, salt, and cinnamon). Set Aside.

3. In a separate bowl, mix pumpkin, oil, egg, honey, vanilla extract together with a whisk or hand held blender until ingredients are blended together.

4. Combine flour mixture with wet mixture. Using a spoon or hand held blender, mix ingredients until just combined to avoid over-mixing. Over-mixing will create a tough loaf. I used a spoon and fold the mixtures together.

5. Add raisins (drained), walnuts, and chocolate chips into the batter. Mix for a few seconds to distribute the goodies. Then pour into the loaf pans and bake for 40-45 minutes. Use a toothpick to check for doneness by inserting it in the loaf and pulling it out. If batter clings to the toothpick, it is not ready. Bake for another 5 minutes and check again.

6. Cool bread completely before slicing. Once baked, remove the bread from pan and cool on a cooling rack. Use a knife to separate sides of the bread with the pan. Don't worry about the bottom since it is lined with parchment paper. Leave the parchment paper on the bread when it is cooling.


Thursday, October 18, 2012

Pumpkin Biscotti

Let's celebrate this fall season by making something crunchy and crispy with pumpkin!
This recipe is very unique because pumpkin is used to make a crunchy and delicious treat. Most pumpkin recipe are for whoopie pie cookies, bread, muffins, and pies, all soft baked deliciousness. This is the case because the water content in pumpkin is very high, thus making pumpkin best for soft baked goods. After reviewing the few recipes I found which were all modification from the original recipe at Simply Recipes, I applied what I learned from making biscotti, studying other's experiences, and from making it a couple of times to end up with this recipe.  Here are the sites where I got inspiration from, Pate a chew, Red Ramekin, F.M.O.H, and King Arthur.
Pumpkin naturally has a very mild favor. People often associate pumpkin flavor with the aroma from fall spices (cinnamon, nutmeg, cloves, All Spice). This recipe will work with and without the inclusion of pumpkin. The only change to the recipe will be the baking time.
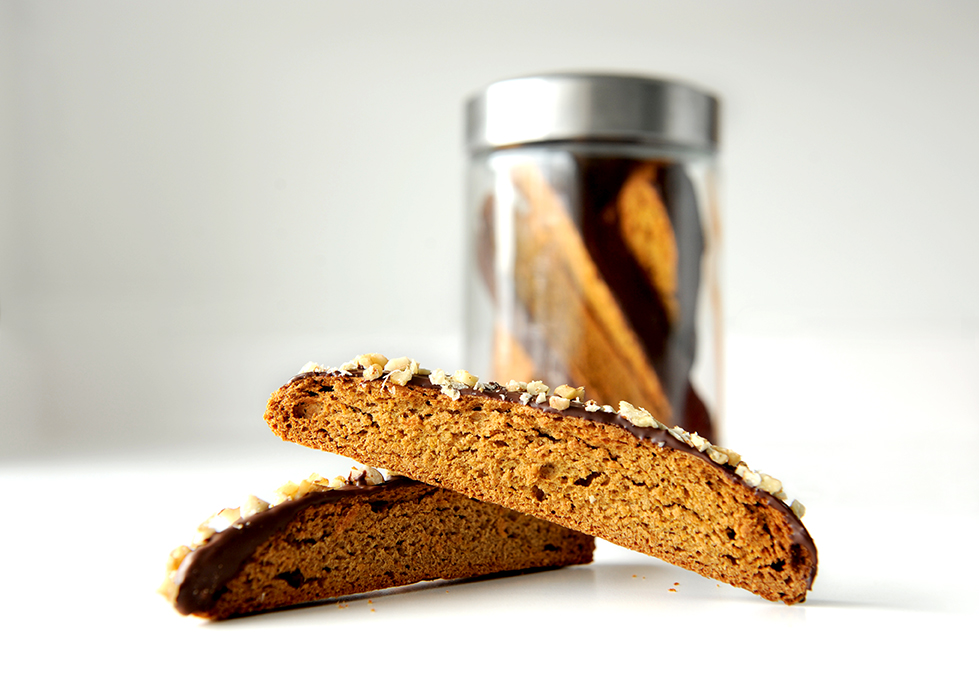
Taste: The thin coat of bittersweet chocolate complements the mildly sweet biscotti. Once dipped in a hot cup of tea, the melting chocolate on the biscotti is even more enjoyable. The mild pumpkin flavor is enhanced by the aroma of cinnamon and spice.
Texture: Super crunchy and crispy! The whole wheat texture is almost unnoticeable because it is masks by the natural texture of this cookie.
Modification: I reduced the sugar content greatly and made it completely whole wheat so this treat will still be nutritious, yet tasty.

Ingredients Depending on size, yield: 30 to 40 biscotti
Organic Whole Wheat Flour (I used King Arthur's)2 cups (9.6 oz)
Organic Sugar (cane or coconut)⅓ cup (95 grams)
Organic Eggs (room temperature)2 whole eggs
Baking Powder1½ teaspoon
Cinnamon (I use Simply Organic)1 teaspoon
Nutmeg (I use Simply Organic)¼ teaspoon
Cloves (I use Simply Organic)¼ teaspoon
Ginger (I use Simply Organic)¼ teaspoon
Salt ½ teaspoon
Organic Butter (room temperature)6 tablespoons
Vanilla Extract 1 teaspoon
Pumpkin Puree (canned or homemade. I used homemade puree from my mother-in-law)½ cup (118 grams or 4.2oz)
*Chocolate Chips (bittersweet, milk, or dark)1 cup
*Chopped Walnuts1 cup
*Crystallized Ginger
* These are optional ingredients. Free feel to add one, two, or a combination of three of these optional ingredients. Only add up to a total of 2 cups of these optional mix-ins altogether. I haven’t tried it, but the combination of chips and ginger may be a bit strange.

Method
  1. Preheat oven to 350F. Line large baking sheet with parchment paper. 
  2. Whisk flour, baking powder, salt and spices in a bowl and set aside. 
  3. Beat room temperature butter, sugar, vanilla extract, eggs, and pumpkin puree together until mixture is smooth and creamy. Scrape down sides of bowl if needed. The batter may look slightly curdled. 
  4. Add flour mixture to the wet mixture. Stir batter until ingredients are incorporated and until batter is smooth. I used a wooden spoon to stir. If using a hand-held mixer or stand mixture, set it on low speed. The dough will be sticky.
  5. Plop dough onto a floured working surface. Roll dough into a log. Then with your hands or rolling pin, roll dough out until desired thickness is achieved. Keep in mind that the length of your biscotti is not the length of the dough but the width. Lightly flour your work surface, dough, and hands as needed. 
    • Long biscotti: roll dough out into a 16" x 7" log with a thickness of ¾”
    • Small biscotti: divide dough in half and shape it into two 9½" x 2" log, about ¾” thick
  6. Move logs to prepared baking sheets. Give room for the dough to bake. They will get bigger. 
  7. Bake for 35 minutes then remove from oven. Either turn off oven or reduce oven temperature to 325F. 
  8. Cool biscotti on cooling rack for 15 minutes. Use a spray bottle filled with room-temperature water or a moist towel to lightly moisturize the top and sides of the logs. This will make the slicing of the biscotti easier. 
  9. Preheat oven to 325F if it is not at it already. 
  10. Slice the log with a serrated knife for ½ to ¾ inch thick slices.
    • I cut mine diagonally for longer but fewer biscotti.
  11. Set biscotti on prepared baking sheet and bake for anther 15 to 20 minutes.
  12. Take biscotti out and flip them onto their other side and bake for another 15 to 20 minutes or until they feel very dry and golden. If they feel a tiny bit moist in the center, it is okay since they will continue to dry out as they cool.
  13. Remove biscotti from the oven and transfer them to a cooling rack. Store airtight at room temperature. 
Optional Steps
Chocolate Coat: Dip biscotti into melted chocolate then place onto parchment paper. For a thin coat of chocolate, I used a wooden spoon to lightly scrape off excess chocolate. Melt chocolate by microwaving it or by stove top. Make sure that no water gets onto the chocolate. If a single drop of water gets into the chocolate, the entire batch is ruined.
    • Microwave: heat chocolate for 30 seconds then stir. Heat for another 15 seconds if 50% of the chocolate is not melted. Heat chocolate in small increments of time until 70-80% of the chocolate is melted. Stir chocolate after each heating session. When 70-80% of chocolate is melted, stir chocolate until the remaining chocolate chunks are melted.
    • Stove top: Place chocolate pieces in a metal boil over simmering water. Stir to melt chocolate evenly. Once chocolate is melted, remove from heat. 
Walnut/Almond Coat: Once a chocolate covered biscotti is made, dip it into your container of chopped walnuts or sliced almonds before letting the chocolate cool and harden.
    • I placed my chopped nuts in a large even and flat container. A cutting board would work too. You can also sprinkle the nuts onto the chocolate covered biscotti. 


Popular Posts