Thursday, October 23, 2014

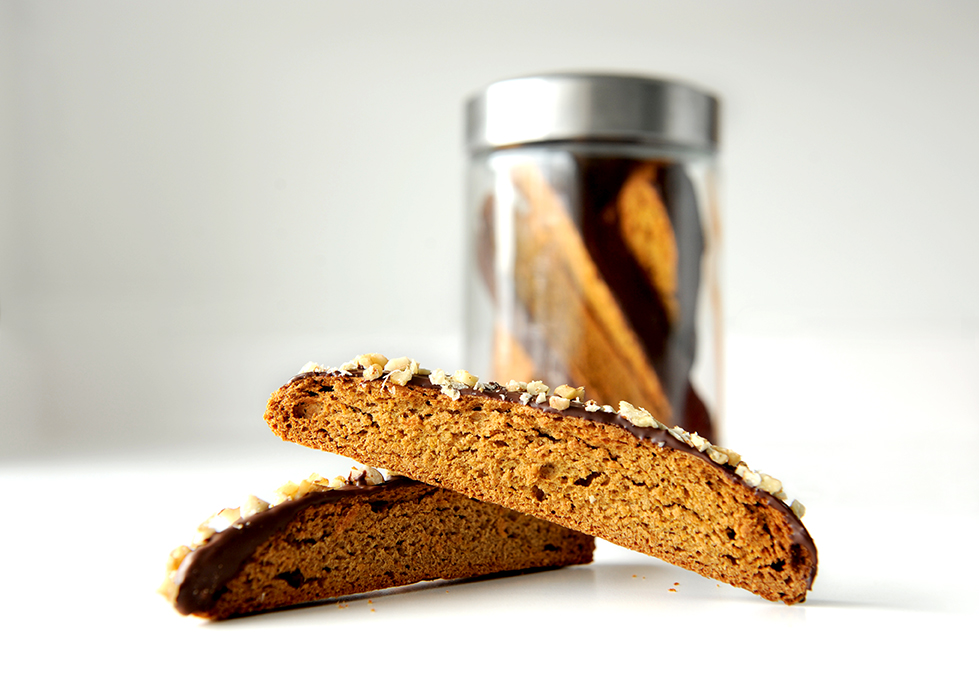
Pumpkin Biscotti ~ A Fall Favorite

Let's celebrate this fall season by making something crunchy and crispy with pumpkin! I'm reposting this recipe since it is one of my fall favorites! I drew inspiration from these sites  (Pate a chewRed RamekinF.M.O.H, and King Arthur) to create this recipe. Enjoy!

Pumpkin naturally has a very mild favor. People often associate pumpkin flavor with the aroma from fall spices (cinnamon, nutmeg, cloves, All Spice). This recipe will work with and without the inclusion of pumpkin. The only change to the recipe will be the baking time.

Taste: The thin coat of bittersweet chocolate complements the mildly sweet biscotti. Once dipped in a hot cup of tea, the melting chocolate on the biscotti is even more enjoyable. The mild pumpkin flavor is enhanced by the aroma of cinnamon and spice.
Texture: Super crunchy and crispy! The whole wheat texture is almost unnoticeable because it is masks by the natural texture of this cookie.
Modification: I reduced the sugar content greatly and made it completely whole wheat so this treat will still be nutritious, yet tasty.

Ingredients Depending on size, yield: 30 to 40 biscotti
Organic Whole Wheat Flour (I used King Arthur's)2 cups (9.6 oz)
Organic Sugar (cane or coconut)⅓ cup (95 grams)
Organic Eggs (room temperature)2 whole eggs
Baking Powder1½ teaspoon
Cinnamon (I use Simply Organic)1 teaspoon
Nutmeg (I use Simply Organic)¼ teaspoon
Cloves (I use Simply Organic)¼ teaspoon
Ginger (I use Simply Organic)¼ teaspoon
Salt ½ teaspoon
Organic Butter (room temperature)6 tablespoons
Vanilla Extract 1 teaspoon
Pumpkin Puree (canned or homemade. I used homemade puree from my mother-in-law)½ cup (118 grams or 4.2oz)
*Chocolate Chips (bittersweet, milk, or dark)1 cup
*Chopped Walnuts1 cup
*Crystallized Ginger
* These are optional ingredients. Free feel to add one, two, or a combination of three of these optional ingredients. Only add up to a total of 2 cups of these optional mix-ins altogether. I haven’t tried it, but the combination of chips and ginger may be a bit strange.

Method
  1. Preheat oven to 350F. Line large baking sheet with parchment paper. 
  2. Whisk flour, baking powder, salt and spices in a bowl and set aside. 
  3. Beat room temperature butter, sugar, vanilla extract, eggs, and pumpkin puree together until mixture is smooth and creamy. Scrape down sides of bowl if needed. The batter may look slightly curdled. 
  4. Add flour mixture to the wet mixture. Stir batter until ingredients are incorporated and until batter is smooth. I used a wooden spoon to stir. If using a hand-held mixer or stand mixture, set it on low speed. The dough will be sticky.
  5. Plop dough onto a floured working surface. Roll dough into a log. Then with your hands or rolling pin, roll dough out until desired thickness is achieved. Keep in mind that the length of your biscotti is not the length of the dough but the width. Lightly flour your work surface, dough, and hands as needed. 
    • Long biscotti: roll dough out into a 16" x 7" log with a thickness of ¾”
    • Small biscotti: divide dough in half and shape it into two 9½" x 2" log, about ¾” thick
  6. Move logs to prepared baking sheets. Give room for the dough to bake. They will get bigger. 
  7. Bake for 35 minutes then remove from oven. Either turn off oven or reduce oven temperature to 325F. 
  8. Cool biscotti on cooling rack for 15 minutes. Use a spray bottle filled with room-temperature water or a moist towel to lightly moisturize the top and sides of the logs. This will make the slicing of the biscotti easier. 
  9. Preheat oven to 325F if it is not at it already. 
  10. Slice the log with a serrated knife for ½ to ¾ inch thick slices.
    • I cut mine diagonally for longer but fewer biscotti.
  11. Set biscotti on prepared baking sheet and bake for anther 15 to 20 minutes.
  12. Take biscotti out and flip them onto their other side and bake for another 15 to 20 minutes or until they feel very dry and golden. If they feel a tiny bit moist in the center, it is okay since they will continue to dry out as they cool.
  13. Remove biscotti from the oven and transfer them to a cooling rack. Store airtight at room temperature. 
Optional Steps
Chocolate Coat: Dip biscotti into melted chocolate then place onto parchment paper. For a thin coat of chocolate, I used a wooden spoon to lightly scrape off excess chocolate. Melt chocolate by microwaving it or by stove top. Make sure that no water gets onto the chocolate. If a single drop of water gets into the chocolate, the entire batch is ruined.
  • Microwave: heat chocolate for 30 seconds then stir. Heat for another 15 seconds if 50% of the chocolate is not melted. Heat chocolate in small increments of time until 70-80% of the chocolate is melted. Stir chocolate after each heating session. When 70-80% of chocolate is melted, stir chocolate until the remaining chocolate chunks are melted.
  • Stove top: Place chocolate pieces in a metal boil over simmering water. Stir to melt chocolate evenly. Once chocolate is melted, remove from heat. 
Walnut/Almond Coat: Once a chocolate covered biscotti is made, dip it into your container of chopped walnuts or sliced almonds before letting the chocolate cool and harden.
  • I placed my chopped nuts in a large even and flat container. A cutting board would work too. You can also sprinkle the nuts onto the chocolate covered biscotti. 

Monday, October 7, 2013

Better than Starbuck's Pumpkin Latte

Better Than Starbuck's Pumpkin Latte (and it is not because it contains Jack Daniels, because it doesn't)

To celebrate the fall season, I'll be featuring pear and pumpkin recipes that will be tasty and easy to make like this Pumpkin Latte. Unlike Starbuck's Pumpkin Spice Latte, this one is lower in calories, will save you money, and there are no hidden ingredients to make this delicious latte. The best part, this recipe does not contain any animal-fat because it is dairy-free and vegan.

Ingredients for Pumpkin Latte

  • 1/4 cup Strong Coffee (I used 1/4 cup water and 1 tablespoon of instant coffee)
  • 2 cups Almond Milk (or soy)
  • 4 tablespoons Pumpkin Puree
  • 3 tablespoons Maple Syrup
  • 1/4 teaspoon Pumpkin Spice*
  • 1/2 teaspoon Vanilla Extract

Ingredients for Pumpkin Spice (I didn't have any so I made my own blend)
  • 1 tablespoon Cinnamon
  • 1 teaspoon Ginger
  • 1 teaspoon Nutmeg
  • 1/2 teaspoon Clove
  • 1/4 teaspoon Cardamon (or All Spice)

The Fancy Method

  1. In a medium saucepan on medium heat, combine coffee, milk, maple syrup, and pumpkin puree together with a whisk. Cook mixture until hot but don't allow mixture to boil.
  2. Remove from heat and add vanilla extract, and spices. 
  3. Stir and let spices infuse latte for a couple of minutes. Strain spices out with a strainer or cheese cloth. This will make your latte smooth and not gritty from the spices. 
  4. Pour into mugs and stir with cinnamon stick if desired.  

The Low Maintenance Method

  1. In a large mason jar, add all liquids together except for vanilla extract. Cap the jar and give it a few good shakes to mix the ingredients together. 
  2. Uncap the mason jar and heat the mixture at 30 second intervals in the microwave until it is hot. Mix mixture in between the 30 seconds intervals with a whisk or cap the mason jar and give it a few good shakes. 
    • Tip: Use a wet towel to uncap the mason jar before heating it in the microwave. A vacuum seal is created because the mixture is hot so be careful when unscrewing the lid. 
  3. Once hot, add vanilla extract and spices. Mix or shake the latte. Shaking it is more fun though. 
  4. Enjoy! 
*Tip: I've put all the ingredients in a mason jar except for the spices the night before. When morning arrives, I give the jar a few good shakes to mix the ingredients, uncap the jar, heat the liquid in the microwave, add the spices, then cap the jar and go. It can be as simple as that!

Thursday, October 3, 2013

Super Moist Chocolate Brownies

The natural sweetness and juicy texture of beets make these brownies tender, moist and flavorful. For someone who doesn't care much for beets, I enjoy these brownies and hope you will too. This recipe is adapted from Vegetarian Times, but I exchanged white flour for regular whole wheat flour. Fancy flour (ie pastry flour) is not needed to successfully make this delicious treat. The moisture from the beets will soften the hardy whole wheat flour, and the cocoa will also mask the wheat flavor. 

I made these for some college students and they surprising liked it. So don't beat up on beets just yet, give them a chance with this super moist chocolate brownie recipe. 

Ingredients


  • 14-oz or 1 cup grated or pureed cooked beets (2 medium)
  • ½ cup unsalted butter (1 stick)- room temperature
  • 1/2 cup sugar
  • 1 tsp. vanilla extract
  • 2 large eggs
  • ½ cup whole wheat flour
  • ¼ cup plus 2 Tbs. unsweetened cocoa powder
  • 1 Tbs. instant espresso powder (optional)

Method

  1. Preheat oven to 375F. Trim leaves off beets and wash thoroughly under running water. Place beets in foil and drizzel with vegetable oil. Sprinkle beets with a pinch of salt, then seal foil. Place wrapped beets on baking sheet and roast in the oven for an hour. Beets should be tender when pierced with a knife. Cool beets before peeling the skin off. Then grate on finest grating plane, or purée beets in food processor until smooth. Whichever is easiest for you. Pureeing the beets will give you a smoother texture.
  2. Lower oven temperature to 350°F. Grease 9-inch square baking dish with butter or oil, then lightly coat it with flour.
  3. Cream butter and sugar in bowl with a whisk or handheld mixer. Butter-sugar mixture should be fluffy and pale yellow. Add vanilla, then whisk in eggs, one at a time to prevent curdling. If curdling occurs, its okay. Try to blend the mixture together by mixing it a little longer. 
  4. Stir beets into the wet mixture, and mix to incorporate ingredients together. 
  5. In a separate bowl, whisk dry ingredients together (flour, cocoa powder, espresso powder). Fold flour mixture into beet mixture until just combined. Stir in chocolate chips. 
  6. Pour into prepared pan and bake for 30 minutes or until toothpick comes out clean when inserted into center of pan.
  7.  Cool. Cut into 16 squares. And Enjoy! Shift coco powder to garnish brownies if you like. 

Why Beets?

  1. Helps Lower Blood Pressure
  2. Source Of Many Vitamins & Minerals
    • To list a few, potassium, magnesium, fiber, phosphorus, iron, vitamin A, B, C, and folic acid. If you're pregnant, this root vegetable is particularly beneficial for you because it contains vitamin B and iron, which plays a beneficial role in replenishing iron and for new cell growth during pregnancy. 
  3. Rich in Antioxidants 
    • What's unique about beets is not that it is rich in antioxidant but because beets contain a variety of of different antioxidants. As an amazing source of different antioxidants, you'll have anti-inflammatory benefits from eating them. 
  4. Cleanse The Body 
    • Beets are an awesome tonic for the liver and works as a purifier for the blood. 
  5. Promotes Positive Mental Health
    • Beets contain betaine, a nutrient made from B-complex vitamin that is used in treatment for depression. Beets also contain trytophan, which relaxes the mind. 
  6. Source Of High Energy
    • Although it is low in calories, it is high in sugar. This type of sugar is released into your system gradually unlike sugar from white bread or candies.
More on how beets are amazing for your health

Monday, September 23, 2013

Watermelon Sorbet with Mint

If you have any watermelon left from the summer season, I would highly recommend celebrating the end of summer with this yummy and guiltless treat. This dessert is refreshing, light, fruity, sweet, low calorie, and most importantly quick and easy.

I bought two watermelons from the farmer's market this week since I knew that it would be my last chance to enjoy watermelon until next year. I brought them home, washed them, cut the rind off, cut the meat into two inch chunks, then packed them in a pyrex container to freeze. Once frozen, they are sweet and flavorful watermelon ice cubes ready to be made into a sorbet.

Since the season is over, don't worry if your watermelon is a bit over-ripped and a tad on the dry side. One of mine was and it didn't make a difference. My husband and I enjoyed every bit and you will too! So if you haven't already done so, go find yourself a watermelon!


Ingredients
- 4 cups of Frozen watermelon chunks
- 1/4 cup of milk (almond or soy, cow's milk if you must)
- 4 mint leaves

Method

  1. Pour the milk into your blender (preferably into a powerful blender like a Vitamix). If you don't have a Vitamix, thaw your watermelon cubes for about 10 minutes or until it is semi-frozen (easily pierce-able by a fork or knife). Add the mint leaves then the watermelon chunks.
  2.  Blend the ingredients together. 
    • If you have a Vitamix: Blend the ingredients on high. Use the tamper to push the ingredients down so everything gets blended together. Blend the ingredients until a smooth consistency forms. It is okay if the some parts of the sorbet is melting. 
    • If you have a lower-end blender: Blend the ingredients together on high but you may need to stop the blender to scrap the sides down with a spoon or spatula. 
  3. Use a spoon or a ice cream scoop to scoop the sorbet into your cup and enjoy!

An elevated dessert for the 21 year and older crowd
I rarely drink...probably once or twice a year. In any case, I bought some vodka to make some vanilla extract and of course I have some left over. So why not enjoy some right? By blending 2 oz of vodka with the rest of the ingredients, it elevates this simple dessert onto another level. The vodka isn't strong so it doesn't mask the natural sweet flavors of the watermelon. It actually enhances the dessert, the flavors of the watermelon comes through strongly and the texture is soften because vodka has a low freezing point. Enjoy!


Thursday, September 19, 2013

Red Velvet minus Red #40

Now that its getting colder, my oven is warming my house and this chocolaty cake is warming my heart. I've been wanting to make a red velvet cake free of artificial colors for a very long time. Fresh beets are readily available at the farmer's market so let's seize this opportunity to make some deliciously moist and flavorful red velvet! I adapted this recipe from Fine Cooking November 2001 but I modified the recipe so you won't get the high and low affect from consuming simple carbs (like sugar and refined white flour) by making this whole wheat.

As you can see, I didn't make the traditional red velvet since I made a bright pink cream cheese frosting to complement the cake. I also didn't artificially colored the cake and frosting bright red. Instead, I made a rich dark red cake. You can obtain a brighter red color if you use 1/4 cup more buttermilk. I made this a second time but added more buttermilk and it lighten the color of the cake and made the red more visible. Adding more buttermilk to the batter did make it more difficult to handle when eating because it made the cake more moist. However, it was quite delicious so my friends and I didn't mind getting a bit messy.


A few great things about this Red Velvet cake:

  • FREE of preservatives and artificial colors!
    • Why do I care about feeding friends (especially children) food free of artificial colors?  It's because "Research has shown this rainbow of additives can cause behavioral problems as well as cancer, birth defects and other health problems in laboratory animals. Red 40 and yellow 6 are also suspected of causing an allergy-like hypersensitivity reaction in children."  You and read more about it here. 
  • 100% whole wheat
    • Whole Wheat nourishes your body and help prevent your blood glucose level from spiking up high and low super fast. 
  • Super moist and tasty without any muddy beet flavor!

Taste & Texture: 

This cake is super moist from the beets. It is chocolatey and lightly sweet without any beet and muddy taste.


Ingredients for one 8" layer cake


  • 2 medium beets (for 3/4 cup of roasted grated beets)
  • 2 cups (8.5 oz) whole wheat flour (finely ground or pastry)
  • 1 teaspoon baking soda
  • 1/2 teaspoon baking powder
  • 1 teaspoon salt
  • 2/3 cup unsweetened cocoa powder
  • 1 teaspoon vegetable oil
  • 6 ounces (3/4 cup) room temperature unsalted butter
  • 1 cup packed brown sugar 
  • 3/4 cup granulated sugar
  • 1 teaspoon pure vanilla extract
  • 2 eggs
  • 1 1/4 cups buttermilk (or 1 1/4 cup milk + 4 1/2 tsp lemon juice)

Method

  1. Preheat oven to 375F. Rack should be in the center and upper third of the oven.
  2. Trim leaves off beets but leave 1/2" of stem. Wash beets thoroughly under running water. 
  3. Place beets in foil. Drizzle it with a bit of vegetable oil and sprinkle a pinch of salt over it. Seal the foil and place it on a baking sheet to roast beets in the oven for about an hour. Beets should be tender when pierced with a knife. To check on the beets, remove beets from oven, open the foil carefully since it'll be super hot. Pierce beet with a knife. If knife easily slides easily into the beet, it is done. Allow the beet to cool before peeling the beets with a paring knife. The skin will come off easily but your hands will be stained pink!
  4. With a box grater, grate the peeled beets on the finest grating plane. Measure 3/4 cup of grated beets for the cake, and measure 2 tablespoons of grated beets for the frosting. Set grated beets aside. 
  5. Reduce oven temperature to 350F.  Prepare cake or muffin pans. Line muffin pans with liner or grease two 8" round baking pans with butter, then trace parchment paper to size of the cake pan to place it in the cake pan. Butter the parchment paper and dust it with flour. Set pans aside. I know this is a lot of work but your cakes will come out of the pan easily and beautifully.
  6. In a medium bowl, whisk flour, cocoa, baking soda, baking powder and salt together. Set aside.
  7. In a separate bowl with a electric stand mixer or hand held mixer, cream butter and sugar together until it is light and fluffy at medium speed for about 3 minutes. If you are using cold butter, it'll take a bit longer. Add one egg at a time to the butter-sugar mixture. Once eggs are incorporated, add the beets and vanilla extract and combine the mixture thoroughly. 
  8. Add half of the dry ingredients to the wet mixture. Slowly mix the ingredients together while adding the buttermilk. Once the ingredients are just incorporated, add the remaining dry ingredients. Beat the mixture on medium speed until the ingredients are just incorporated. Try not to overmix or the cake will be tough and flat. With a spatula, scrapes down the sides and fold the batter to finish incorporating the ingredients together. The batter will be thick. 
  9. Divide the batter between the two prepared cake pans or lined muffin pans. Batter will be thick so use a spatula to help pour the batter into the pans. 
  10. Bake for 20 minutes (for muffin pan), 23 to 25 minutes (for a 9-inch pan) or 30-32 minutes (for an 8-inch pan).  Cake is done when a skewer/toothpick inserted in the center comes out clean.  
  11. Remove cakes from the oven and allow to rest for 10 minutes.  Invert cakes onto a cooling rack to cool completely before decorating the cake. 

To make the Frosting

For this frosting, I actually don't know the recipe. I made a batch of this really yummy and dairy-free vanilla frosting a few months ago for another cake. I had about 1 cup of frosting leftover and since I wasn't going to let some good-o frosting go to waste, I froze it in the freezer.

My vanilla frosting has a great refreshing and tangy flavor because it contains fresh lemon juice. I realized that the tangy flavor would complement the red velvet since cream cheese has a tangy flavor. So I pulled the frozen frosting out of the freezer and defrost it. To make it a bit more fun and attractive for young kids, I simply took about a tablespoon of roasted grated beets for this wonderful bright color.

I'll come up with my dairy-free vanilla frosting recipe and share it with you once I remake it. Since I made the frosting by tasting it...I didn't write it down. So sorry! I totally regret it now. But thats how I experiment and make delicious food. In the mean time, I included the frosting recipe from Fine Cooking below.

Fine Cooking's Pink Frosting Recipe

  1. Beat the cream cheese until smooth and creamy with an electric beater. Add the butter and beat until smooth and blended into the cream cheese. Scrape down the bowl as necessary. 
  2. Add the beets and beat until combined. 
  3. Add powdered sugar, vanilla extract, milk, lemon juice, and salt.
  4. On medium speed, beat the ingredients together until its smooth and silky.
  5. Fridge frosting for 30 minutes before frosting it on cooled cakes. 


To assemble the cake

  1. Place one layer of cake on a cake stand and top it with a generous dollop of pink frosting. 
  2. Spread frosting evenly with a knife/cake-spreader then place second cake on top of the frosting. 
  3. Frost the top of the cake and the sides. To prevent crumbs from being apart of the frosting, first frost the cake with a thin layer of frosting then fridge it for about 5-10 minutes before frosting the cake a second time with a thicker layer.
  4. Fridge the cake a least an hour will make the cake easier to slice. Cake will last in the refrigerator for up to 4 day if its well wrapped.

Friday, April 12, 2013

Homemade Pop Tarts!


I'm back! And I'm happy to be back! Thank you so much for being patient with me. The last few months have been busy since I've been working on a few large projects such as baking and packaging 350 chocolate chip cookies for a friend's wedding, organizing a bridal shower, and doing some freelance wedding and product photography.

You heard me, Homemade Pop Tarts! I've only had the commercial pop tarts once and after one bite, I couldn't finish it. They are loaded with sugar, artificial coloring, preservatives, and more refined sugar! From noticing how people love pop tarts, I wanted to make some homemade ones as a alternative to the sugar loaded commercial pop tart. 

A few great things about this pop tart:

  • You can choose whichever fruit preserve you are craving for in these cute tarts. 
  • It's 100% whole wheat, so it'll provide nourishment to your body 
  • Cute and portable 
  • Artificial coloring free, preservative free, and high fructose corn syrup free 

Taste & Texture: 

The crust is flaky, butter, and easy to bite into. The nutty flavor of the whole wheat flour is balanced by the sweetness and flavor of the filling. 


Ingredients

  • 2 cups (8.5 oz) whole wheat flour
  • 1 teaspoon salt
  • 1 cup (2 sticks) cold butter
  • 1/4 cup water
  • 2 eggs
  • 1 tablespoon sugar

Filling

Fruit preserve or jam (Sugar-free/ High fructose corn syrup free), homemade cinnamon apple compote, the choices are limitless!

Method- Making the dough

  1. Cut up cold butter into pea sized pieces. Set aside. 
  2. Whisk flour, salt, and sugar together in a bowl. Add butter and use pastry blender to rub the butter into the dry ingredients. A crumbly dough will start to form. 
  3. In a clean bowl, whisk egg yolks and milk together until combined. Add this mixture into the flour-butter mixture. Mix with your hands until a dough starts to form. Knead dough onto a work surface until the dough comes together. During the kneading, smear the butter in the dough with the palm of your hands. This will help the dough come together. 
  4. Divide the dough into two equal portions and wrap it with plastic wrap. Chill in the fridge for at least one hour. 

Method- Assembling the tarts

  1. Preheat oven to 375F. Line baking sheet with parchment paper. 
  2. Dusk work surface with flour to roll out one of the dough with a rolling pin. Leave second portion of dough in the fridge. Roll the dough out until it is about 1/8" inch. Dust dough, rolling pin, work surface as needed to prevent sticking. 
  3. With a pizza cutter or knife, trim the dough into a rectangle. Then cut the rectangle into desired sized pop tarts. Recommended size: 3.5" x 4.5." With the dough scrapes, combine and roll it out to repeat step 1 and 2. 
  4. Transfer the rectangles to prepared baking sheet. Allow a two inch space between each rectangle. with a fork, prick the rectangles. Then place baking sheet in the fridge. 
  5. Take out second piece of dough from fridge and with it, repeat step 1 and 2. Then prick the dough with a fork. Set aside in the fridge. They can be stacked but dust it with flour to prevent sticking. 
  6. Whisk an egg with some water (say 1 tablespoon) in a bowl. Set aside. 
  7. Take out baking sheet with the prepared rectangles from fridge. Brush a thin coat of egg wash over each rectangle. Then spoon in 1 tablespoon of desired filling (jam/fruit preserve) into each rectangle. Spread the jam evenly but leave a 1 cm boarder around filling. 
  8. Take out the other prepared rectangles from the fridge. Doing this one at a time, brush a thin coat of egg wash on the side without the prick marks. Then place it over the jam-covered rectangles. Press the edges to adere the sides. Repeat this for all jam-covered rectangles. 
  9. With a fork, crimp the edges of the tart. You may need to dip the fork in flour to prevent it from sticking to the dough. 
  10. Lightly brush each tart with egg wash for a shiny golden look. 
  11. Bake these for 15-20 minutes at 375F. If you are not ready to bake them, store them in the fridge on the baking sheet until you are. Enjoy! 


Wednesday, January 16, 2013

Winter Vacation in Portland, Oregon

Hi There! I'm back in Portland, Oregon to spend the beginning of this new year with my family. I've been back for a week and it has been great except for being sick with my husband.  We are finally feeling much better. Unfortunately, I was not inspired to bake something fun, creative and healthy, nor was I in the condition to be in the kitchen. However, I do have some photos of a yummy cake to show you.

This is a Mango Mouse Sponge Cake from my sister's boyfriend's family. Andy's family were out grocery shopping and decided to get this for us from Meianna Bakery. It was so nice of them. The cake was a huge treat, especially since it is not something I would bake. It was a sponge cake sandwiched with a fluffy mango mouse and topped with a lightly sweet whipped cream and fruit.

When I return back to Rochester (Feb 2nd), I'll come up with something less sweet and as tasty and beautiful!


Thursday, January 3, 2013

Baked Purple Yams *updated*

Happy New Year! I hope you had an amazing 2012 and is excited for all the baked deliciousness this blog will feature this year.

To get this New Year off to a healthy and delicious start, I want to share this simple recipe for baked purple yams with you.  It's healthy, all natural (no added preservatives, calories, chemicals, etc), and super delicious and naturally sweet. You may remember this yam from the time when I used it to bake a chiffon cake.


Taste&Texture:

Purple Yam is super sweet and moist just like regular baked yams or sweet potatoes. When yam is dry, has a powdery-like texture, and light in color the yam is either spoiled or close to being spoiled (as pictured below).

*Updated* I thought the sweetness of purple yam depends on the size of it. However, I am wrong. I learned from my mom this week that the sweetness is determined by how baked the yam is. When baked perfectly, it should be dark purple and very sweet. When it is a bit raw, you won't see a saturated purple color and it won't be as sweet.


Ingredients & Equipment
  • Purple Yam (As many as you want)
  • Foil
  • Baking tray or sheet
  • Oven or Toaster Oven

Method

  1. Wash the yams well by scrubbing it under running cool water. Pat dry with a towel. 
  2. Wrap each yam with aluminum foil and place yams next to each other on a baking sheet or tray. You don't need to space far them apart. Just don't stack the yams on top of one another.
  3. Place yams in the oven or toaster oven and bake at 325F for about one hour. If you have large sized yams, you may need to bake it for an additional 30 minutes. 
  4. Check yams for doneness by inserting a knife into the yam. If the knife goes in smoothly and comes out smoothly, it is done. You can do this without unraveling the foil if you wish. The skin and inside of the yam should easily be penetrated. The yam should be dark purple, moist, and very tender.


Thursday, December 27, 2012

Mini Maple-Walnut Biscotti

Here is a simple recipe adapted from King Arthur's website for Maple-Walnut Biscotti. I was inspired try a couple different biscotti recipe this winter since my neighborhood grocery store has been selling these cute store-baked mini biscotti's for $11.99lb. They looked good but not good enough for $11.99 a pound. So let me introduce to you one of the two biscotti I made last week. 

I made a couple modifications to the recipe but you can find the original here. I omitted the white sugar, replaced maple flavoring with vanilla extract, and replaced white flour with White Whole Wheat flour. I also didn't make the topping. I let my husband made it. When I asked him how he made it, he couldn't give me a recipe since he just experimented by cooking maple syrup with butter and a couple other ingredients which he couldn't recall. Sorry! The maple coating for the biscotti was messy to make but it was tasty. From cooking down the syrup, it turned dark brown and harden easily. We made letters, funny shapes and designs with it which you can see in the photos below. 

Taste & Texture: The biscotti itself was mildly sweet since I omitted the white sugar. They were tasty,  especially with the maple-walnut coating. I omitted the white sugar since I knew that the maple coating will add enough flavor and sweetness to the biscotti. The biscotti was a bit crunchy but firm. It was too hard to consume without tea after a few days. I made these last week and enjoyed a couple with hot tea today since I am snowed in. 


Ingredients
2 cups Walnut (coarsely chopped & toasted)
2 large Eggs
¼ cup Brown Sugar
¼ cup Maple Syrup
½ teaspoon Vanilla Extract
⅓ cup Butter (melted)
2½ cup Whole Wheat Flour (any type and kind)
½ teaspoon Salt

Optional Topping
2 tablespoon maple Sugar
Chopped Walnuts

Method
  1. Preheat oven to 350F. Prepare baking sheet by lightly greasing it or lining it with parchment paper. 
  2. Toast walnuts in oven at 350F for 8 to 10 minutes, till they're light golden brown. 
  3. Beat eggs, sugar, maple syrup, and vanilla extract together. Add melted butter and beat until smooth. 
  4. Mix flour, baking powder, salt, and nuts together. Then add it to the wet mixture. Mix together. 
  5. Divide dough into four equal parts on a lightly floured surface.  Shape each dough into a rough rectangle to your desired side. For smaller sized biscotti, roll dough out into a more narrow log. 
  6. Using wet fingers, smooth top and sides of rectangles. Sprinkle maple sugar on top of each rectangle if desired. 
  7. Bake biscotti for 30 minutes. Remove from oven and cool on cooling rack for 10 minutes. 
  8. Use a serrated knife and cut biscotti on a cutting board. Cut biscotti into ½" thick slices. Place slices onto a prepared baking sheet. It is okay to place them closely together.
  9. Bake for 10 minute on each side. They should be slightly golden. Cool on baking sheet.


Thursday, December 13, 2012

Rugelach (cane sugar-free and parve)

To continue to celebrate the Christmas Season, I'm on a roll to make delicious cookies that contains no sugar or much less sugar compared to store-bought cookies and pre-made cookie mixes. Rugelach is a top pick on my cookie list this year because it is fun to make, a traditional Holiday favorite, and can be easily personalized to any taste. I made some with two different fillings, a cocoa-date filling and a raisin-walnut filling. You can fill yours with whatever you like, from raspberry jam to a chocolate ganache. 

Most versions of Ruglach contains cream cheese. I found this recipe on a Hebrew recipe website that excluded cream cheese, making it pareve it can be eaten after a meal containing meat. I liked omission of cream cheese since lowers the calories and fat content in this treat. This cookie is also great for those who are diabetic. After reading many reviews of recipes similar to this one, I learned that many diabetic are big fans of this cookie because of the low sugar context from the dried fruit. 

I was a bit nervous when making the dough for this cookie because it requires yeast (I've just started to learn how to bake with yeast) and I used Whole Wheat Flour instead of white flour (aka all purpose flour).  Since my house tends to be cool, I let my dough rise in a bread machine. The dough raised well and I was quite pleased with it. I only had enough time to use half of it, so I placed the other half in the fridge. Don't do what I did since the dough that was stored in the fridge had a fermented smell the next day. It was not pleasant. I think the fermented smell arise because of having too much yeast in the dough. 

Taste & Texture: I was pleased with the cookies when fresh but these are not a favorite. They are pretty, but in my opinion  they are too bread like to be called a cookie. I also made mine very small so they came out a bit crunchy. The filling was great because the cookie didn't have any sweetness to it. If I make this again, I will include honey into the dough. The cookie had a prominent wheat flavor and it would be more enjoyable if another flavor like honey was included. 

I didn't store them in an airtight container so they were a bit hard the next day. If I did store them correctly, I don't think I would have enjoyed anyways since I made a couple mistakes. I was eager to bake these cookies since it was late in the evening. My house was cold so I should have let my dough poof for a longer period of time to allow it to rise again for a softer texture. I also baked them for a shorter period of time because I made my cookies smaller. 


Ingredients for 30 Rugelach
3 cups (13.5oz) Flour
½ teaspoon Salt¼ cup sugar
2 eggs¼ cup Water (lukewarm)
½ cup Milk (lukewarm)
1 teaspoon Vanilla Extract
½ cup Butter
1 tablespoon Yeast

1 egg beaten to brush tops of cookies for a shine (I omitted this step)

Ingredients for Filling
Cocoa-Date filling- soak a cup of dates in water for at least 30 minutes to soften the dried fruit. Drain the fruit and chop and mash it into a paste. Add cocoa powder to it to make it chocolaty. Add one teaspoon at a time to adjust taste to your preference.

Raisin-nut Filling: Soak desired amount of raisins in water for at least 30 minutes so they will become plump. Drain water well. Mash them and mix some chopped walnuts into them. 

Fruit Preserve Filling- Choose any type of fruit preserve, jam or curd you'll like in your cookie. Apricot  Raspberry and Strawberry preserves are popular flavors.

Optional fillers: Dried fruits and chopped or sliced nuts such as walnuts, almonds, pecans, can be included in the filling for added flavor and texture. 

Method
  1. Put all the dough ingredients in a bowl and combine together to make dough. Knead for about 5 minutes until dough is soft and elastic. Place dough in a clean bowl and cover the bowl with saran wrap. Let dough rise for about an hour and a half, until it doubles in volume. If using a bread machine, place ingredients into machine according to your bread machine manual. Let the machine knead the dough and allow it to rise in it. Stop the machine when completed. 
  2. Preheat the oven to 340F. Line parchment paper on baking sheet or use nonstick baking sheets. 
  3. Lightly flour a work surface to make the cookies. Lightly flour a rolling pin too. Divide the dough into two equal portions. For both doughs, roll it out into a rectangle that is about half and inch to one fourth of an inch thick, and follow the steps below. 
  4. Spread filling generously over the dough as you would. Leave edge of the dough to be free of  fillings. Your dough should look like a rectangular pizza, having an even layer of filling everywhere except for the "crust," edge. 
  5. With a pizza cutter or knife, cut the rectangle for triangular wedges. View diagram below to see how to cut triangular wedges. 
  6. Start with the wide side (the pizza "crust" side) and roll it up tightly. You should end rolling the point of the wedge last. 
  7. Do this for all wedges. and transfer them to a prepared baking sheet. Place the tip of the wedge on the bottom. I wasn't able to place the tip of my wedge on the bottom since I made my cookies too small.
  8. Let rugelach sit at room temperature to proof for at least 30 minutes. Lightly brush each cookie with egg wash. Be sure to not press too hard to deflate it. 
  9. Bake rugelach for 15-20 minutes or until golden brown. Cool on cooling rack. 
Yellow rectangle indicates shape of rolled dough. Solid lines indicate vertical and horizontal cuts through the dough. Dotted lines indicate vertical lines cut through the dough to create triangular wedges. Feel free to ask me for help if you run into trouble or is confused. 

Monday, December 10, 2012

Gingerbread Cookies ( Cane Sugar-Free)

Every holiday, I crave for gingerbread cookies even though I was never fond of them. My craving lead me to make these crunchy gingerbread man. I used the same batter to make a simple gingerbread house too! I decided not to decorate it since I want to eat the gingerbread without any artificial food coloring found in decorative candies. This recipe is chosen from Weelicious because it contains less sugar but much flavor compared to other recipes.

Taste & Texture: This gingerbread cookie is sweet with a kick from the ginger. The sweetness is flavorful from maple syrup and molasses. It is super crunchy which made it very addictive to eat for both my husband and myself. Softer and chewier textured cookies can be made with this batch by baking it for a shorter amount of time, but we didn't enjoy them. 
Ingredients:
3½ cup of Whole Wheat Flour (any type)
¾ teaspoon Baking Soda
½ teaspoon Salt
½ cup Maple Syrup
⅔ cup Molasses
1 Egg
½ teaspoon Vanilla
½ cup Butter (room temperature)
2 teaspoon Ginger
1 teaspoon Cinnamon
¼ teaspoon Clove & Nutmeg

Method: 
  1. 1. Sift the dry ingredients into a bowl.
  2. 2. In a separate bowl, cream butter with maple syrup until fluffy. Add egg, vanilla, molasses and mix until well combined. You can do this by hand or with a padded stand mixture or standard handmixer.
  3. 3. Gradually add flour mixture to the butter mixture. Mix until well combined. 
  4. 4. Divide dough in half and form into 2 disks. Refrigerate in plastic wrap or parchment paper for 2 hours or overnight.
  5. 5. Preheat oven to 350 degrees and line 2 cookie sheets with parchment paper or silpats.
  6. 6. On a lightly floured surface OR between two pieces of parchment paper, roll out one of the disks until it’s 1/4 thick all around.
  7. 7. Cut out cookies with different shapes (gingerbread men, stars, christmas tree, etc). Use a spatula to gently transfer cookies to a baking sheet. 
  8. 8. Bake the cookies for 10-12 minutes.
  9. 9. Remove to a cooling rack. If you wish, decorate cookies after they are cooled.
  10. 10. Decorating Ideas: Use raisins, raw sugar as sprinkles, chocolate chips to decorate gingerbread. 


Popular Posts