Tuesday, October 23, 2012

Things You Might Not Know About Your Spice Rack


I've always wondered if there is a difference between regular spices and organic spices. In general, spices are not cheap, especially Cardamom (or cardamon). I still haven't bought a bottle of Cardamom yet because it is $12 for a 2.38oz bottle. Due to the price discrepancy between organic and non-organic spices, I decided to do some research to determine if it is a good investment to buy organic spices over regular spices. Here is a a brief article on the highlights of my findings.
Differences Between Organic And Regular Spices 
Regular Spices go through either irradiation or fumigation sterilization method. These methods are used because it is inexpensive to the manufacturer. Although bacteria is killed by these methods, flavor, color, medicinal and nutritional value can be altered and lost.

  • Irradiation: is the process of exposing the spice or any product to radiation.
  • Fumigation: is the process of exposing the spice to Ethylene Oxide (ETO), a pesticide.
Organic Spices are the only guaranteed spices to be sterilized by steam treatment, a process that guarantees to have no carcinogenic or toxic drawbacks. This method alters the color and flavor of spices minimally compared to the other sterilization methods. Organic spices are guaranteed to be free of harmful additives like artificial colors and artificial flavors.
  • Steam treatment/Steam Technology: the use of highly heated water to kill microbes. This process is every expensive and sophisticated because of the need to maximize flavor of the spice while killing microbes. 
Organic Spices Are Costly...Is It Worth It?
I've just moved to Rochester and was grocery shopping with my parents-in-law. I want to buy some spices to make my own curry. When faced with the decision to choose between organic spices or cheaper alternatives, it was more stressful than it should be. 

I was on a budget and my parents-in-law knew about it. As I stood before the unending aisle of spices, all the different reasons why I shouldn’t and should purchase organic spices flooded my mind in the 30 seconds I gave myself to make a decision. In the end, I took a deep breath, placed the organic spices in my basket and cowardly rushed to paid for my purchases, before my parents-in-law could see the purchases I made with the budget I’m on. 

I’ll confidently share with you the reasons why I gave up a few grocery items to purchase those organic spices. I hope this will help you form your own opinion.


Cost & Investment: An average jar of a two to three oz organic spice is $4 and will last for me at least six months if not a year. I only use ¼ to 1 teaspoon of each spice to make a large batch of curry or pumpkin bread. From knowing this, I saw the cost of organic spices to be inexpensive for the quality and quantity.


Health: There is no concrete proof that the use of radiation or fumigation in spices can cause cancer, or that it severely alters the nutritional content. However, I don’t want to risk promoting cancer to newlywed husband even if it means he has to be vegetarian for the week. From a logical standpoint, choosing a food product that has been sanitize by heat and water seems to be more safe than utilizing a pesticide or radiation.


Quality: 
For my cooking and baking, I don’t want to include any artificial flavors or colors. By investing in organic spices, I don't need to worry about chemical additives and know that my baked deliciousness will be well seasoned and fragrant. If I am using high quality ingredients to make awesome deliciousness, I need to follow through to the end and I can't let a few spices stop me.

I Can't Afford Organic Spices, What Is The Best Alternative?
If you're on a budget and cannot afford organic spices, look for spices that do include any additional ingredients. After all, you're purchasing the spice, not the additives! Companies that add artificial colors, preservatives or other additives to their product are legally required to include them on the food label.

Additionally, a spice that does not contain any artificial colors or flavors is more likely to be of higher quality and has been through a better sanitation process. Artificial colors and flavoring are most likely added to the spice to mask or to make up for flavor or color that was lost during the manufacturing process. Spices naturally flavor and color food, and they do not need additives to do this. 


Facts & Connections: Fumigation is known to alter the flavor and color of mustard seeds and turmeric. If mustard seeds and turmeric have artificial coloring and other chemicals added to it, they have probably been through fumigation.

Thursday, October 18, 2012

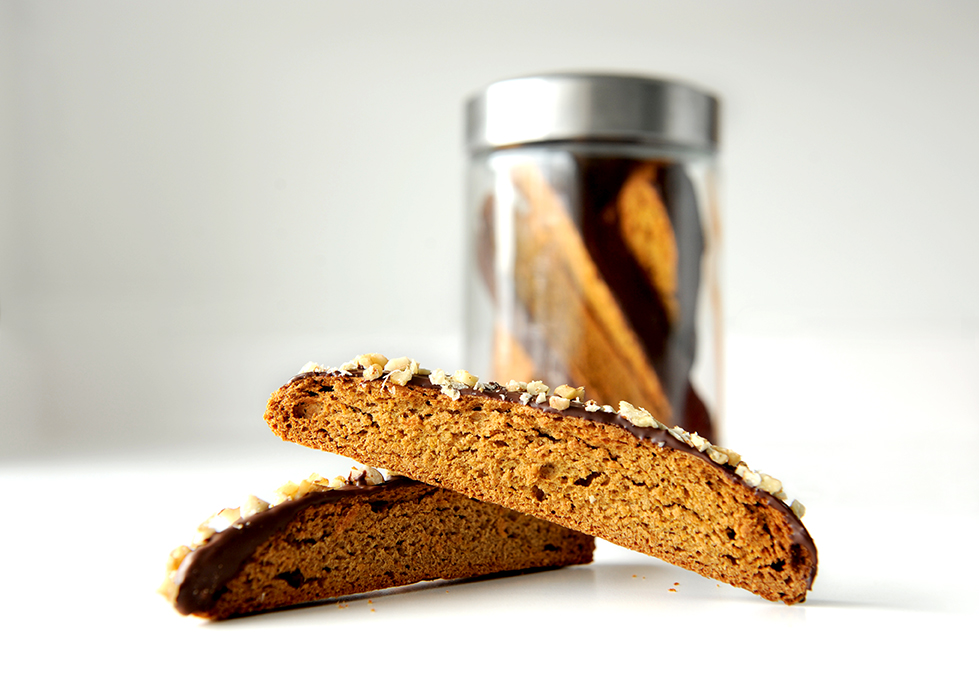
Pumpkin Biscotti

Let's celebrate this fall season by making something crunchy and crispy with pumpkin!
This recipe is very unique because pumpkin is used to make a crunchy and delicious treat. Most pumpkin recipe are for whoopie pie cookies, bread, muffins, and pies, all soft baked deliciousness. This is the case because the water content in pumpkin is very high, thus making pumpkin best for soft baked goods. After reviewing the few recipes I found which were all modification from the original recipe at Simply Recipes, I applied what I learned from making biscotti, studying other's experiences, and from making it a couple of times to end up with this recipe.  Here are the sites where I got inspiration from, Pate a chew, Red Ramekin, F.M.O.H, and King Arthur.
Pumpkin naturally has a very mild favor. People often associate pumpkin flavor with the aroma from fall spices (cinnamon, nutmeg, cloves, All Spice). This recipe will work with and without the inclusion of pumpkin. The only change to the recipe will be the baking time.
Taste: The thin coat of bittersweet chocolate complements the mildly sweet biscotti. Once dipped in a hot cup of tea, the melting chocolate on the biscotti is even more enjoyable. The mild pumpkin flavor is enhanced by the aroma of cinnamon and spice.
Texture: Super crunchy and crispy! The whole wheat texture is almost unnoticeable because it is masks by the natural texture of this cookie.
Modification: I reduced the sugar content greatly and made it completely whole wheat so this treat will still be nutritious, yet tasty.

Ingredients Depending on size, yield: 30 to 40 biscotti
Organic Whole Wheat Flour (I used King Arthur's)2 cups (9.6 oz)
Organic Sugar (cane or coconut)⅓ cup (95 grams)
Organic Eggs (room temperature)2 whole eggs
Baking Powder1½ teaspoon
Cinnamon (I use Simply Organic)1 teaspoon
Nutmeg (I use Simply Organic)¼ teaspoon
Cloves (I use Simply Organic)¼ teaspoon
Ginger (I use Simply Organic)¼ teaspoon
Salt ½ teaspoon
Organic Butter (room temperature)6 tablespoons
Vanilla Extract 1 teaspoon
Pumpkin Puree (canned or homemade. I used homemade puree from my mother-in-law)½ cup (118 grams or 4.2oz)
*Chocolate Chips (bittersweet, milk, or dark)1 cup
*Chopped Walnuts1 cup
*Crystallized Ginger
* These are optional ingredients. Free feel to add one, two, or a combination of three of these optional ingredients. Only add up to a total of 2 cups of these optional mix-ins altogether. I haven’t tried it, but the combination of chips and ginger may be a bit strange.

Method
  1. Preheat oven to 350F. Line large baking sheet with parchment paper. 
  2. Whisk flour, baking powder, salt and spices in a bowl and set aside. 
  3. Beat room temperature butter, sugar, vanilla extract, eggs, and pumpkin puree together until mixture is smooth and creamy. Scrape down sides of bowl if needed. The batter may look slightly curdled. 
  4. Add flour mixture to the wet mixture. Stir batter until ingredients are incorporated and until batter is smooth. I used a wooden spoon to stir. If using a hand-held mixer or stand mixture, set it on low speed. The dough will be sticky.
  5. Plop dough onto a floured working surface. Roll dough into a log. Then with your hands or rolling pin, roll dough out until desired thickness is achieved. Keep in mind that the length of your biscotti is not the length of the dough but the width. Lightly flour your work surface, dough, and hands as needed. 
    • Long biscotti: roll dough out into a 16" x 7" log with a thickness of ¾”
    • Small biscotti: divide dough in half and shape it into two 9½" x 2" log, about ¾” thick
  6. Move logs to prepared baking sheets. Give room for the dough to bake. They will get bigger. 
  7. Bake for 35 minutes then remove from oven. Either turn off oven or reduce oven temperature to 325F. 
  8. Cool biscotti on cooling rack for 15 minutes. Use a spray bottle filled with room-temperature water or a moist towel to lightly moisturize the top and sides of the logs. This will make the slicing of the biscotti easier. 
  9. Preheat oven to 325F if it is not at it already. 
  10. Slice the log with a serrated knife for ½ to ¾ inch thick slices.
    • I cut mine diagonally for longer but fewer biscotti.
  11. Set biscotti on prepared baking sheet and bake for anther 15 to 20 minutes.
  12. Take biscotti out and flip them onto their other side and bake for another 15 to 20 minutes or until they feel very dry and golden. If they feel a tiny bit moist in the center, it is okay since they will continue to dry out as they cool.
  13. Remove biscotti from the oven and transfer them to a cooling rack. Store airtight at room temperature. 
Optional Steps
Chocolate Coat: Dip biscotti into melted chocolate then place onto parchment paper. For a thin coat of chocolate, I used a wooden spoon to lightly scrape off excess chocolate. Melt chocolate by microwaving it or by stove top. Make sure that no water gets onto the chocolate. If a single drop of water gets into the chocolate, the entire batch is ruined.
    • Microwave: heat chocolate for 30 seconds then stir. Heat for another 15 seconds if 50% of the chocolate is not melted. Heat chocolate in small increments of time until 70-80% of the chocolate is melted. Stir chocolate after each heating session. When 70-80% of chocolate is melted, stir chocolate until the remaining chocolate chunks are melted.
    • Stove top: Place chocolate pieces in a metal boil over simmering water. Stir to melt chocolate evenly. Once chocolate is melted, remove from heat. 
Walnut/Almond Coat: Once a chocolate covered biscotti is made, dip it into your container of chopped walnuts or sliced almonds before letting the chocolate cool and harden.
    • I placed my chopped nuts in a large even and flat container. A cutting board would work too. You can also sprinkle the nuts onto the chocolate covered biscotti. 


Saturday, October 13, 2012

Chinese Almond Cookies w/ a Spin

I'm planning on having tea with a few girl friends today. Since we all so happen to be Chinese, I couldn't think of a better way to enjoy our warm cup of tea with the buttery and crispy Chinese Almond Cookie.
Since I've never made Chinese Almond Cookies,  I found as many recipes for it to compare. I ended choosing three that looked best to me. My favorite version is adapted from David Lebovitz which so happens to be non-Chinese because of an extra ingredient, Tahini. After all the modifications I made to each recipe, I figured it doesn't matter if its nontraditional since it tastes delicious. 

Tahini is roasted sesame seeds with some olive oil. It is the secret ingredient to making good hummus and a variety of other dishes and desserts. I made my own by roasting sesame seeds and grinding it with a coffee grinder. You would usually add olive oil to the ground sesame seeds to make it into a paste. I used sunflower oil instead of olive oil since it has a neutral flavor. 

David Lebovitz's Almond Cookie
Taste: Mildy sweet with a very settle almond flavor and strong sesame seed flavor.
Texture: Crispy and tender.
Modification: Replaced all purpose flour with whole wheat pastry flour. 

Honey Bee Sweets (HBS)
Taste: Very mild wheat flavor, almost undetectable. Cookie is very flavorful from the butter and almond. Of the three cookies, the almond flavor is most noticeable. This cookie is very sweet even with the reduction of sugar. This is my husband's favorite.
Texture: Very crispy and tender. This one is the crispiest of the three.
Modification: Replaced all purpose flour with whole wheat pastry flour and whole wheat flour. Reduced the amount of sugar so ration between flour and sugar is 1:2 instead of 1:1

Blessed Homemaker (BHM)
Taste: Sweet with a strong whole wheat flavor that overpowered almond flavor.
Texture: Most tender of the three cookies.
Modification: Replaced all purpose flour with whole wheat pastry flour.
Ingredients
*These are the ingredients I used to make the cookies. For all recipes, I omitted white flour aka all purpose flour for whole wheat pastry flour or a combination of whole wheat and whole wheat pastry flour. I also used homemade almond meal from the pulp I had leftover from making almond milk. You can make your own or buy it from Trader Joe's. 
*As always, use organice ingredients. If you don't like cane sugar, try coconut sugar. 

David Lebovitz (Makes about 35 tablespoon sized cookies)HBS
(Makes 4 dozen teaspoon sized cookies)
BHM
(Makes 4 dozen teaspoon sized cookies)
Whole Wheat Pastry Flour1 cup (140g)75g150g
whole wheat flour1 cup + 2 tablespoons (140g)75g
-----
cornstarch30g
-----
baking powder
-----
-----
1 tsp
baking soda
-----
-----
¼ tsp
almond flour2½ oz (70g) 100g160g
cold unsalted butter5½ oz (150 g) 225g
-----
oil (sunflower/canola/etc)2oz (100g)
sugar¾ cup (150 g) 150g60g
vanilla extract1 teaspoon 1 tsp
saltPinch½ tsp½ tsp
water2 tbs
-----
-----
raw tahini paste¾c+2tbs (200g)
-----
-----
egg
-----
-----
to brush

Method for all recipes
  1. Have baking sheets ready. I use light colored baking sheets and did not grease or use parchment paper. Since my baking sheets are light colored, my cookies will cook slower.
  2. Mix all the dry ingredients together (wheat flour, almond flour, salt, sugar, and cornstarch, baking powders, baking soda and tahini if recipe calls for it). 
  3. Then add butter or oil (whichever the recipe calls for) to the flour mixture. If it calls for butter, break up the butter with a biscuit blender to blend butter into flour. I used a whisk since I didn't have a biscuit blender. The dough will be crumbly, this will make the cookie crispy and tender. 
  4. Kneed the dough until it becomes a smooth dough.
    • For Lebovitz' recipe, add water and form into smooth dough by kneading it. Dampen your hands if it feels too dry. If you add an additional tablespoon of water, it will be easier to work with but your cookie will not be as crispy or crumbly.
  5. Create small balls of dough (I used a tablespoon for same sized cookies) and place it on a baking sheet. Flatten each dough with your finger or spoon. I placed half an almond on my cookies.
    • Fridge your dough for a couple of hours unless you are impatient. By putting it in the fridge, you will have crispier and more crumbly cookies.
  6. Bake cookies at 350F for 10-15 minutes or until golden brown.

Monday, October 8, 2012

Honey Muffins

These Honey Muffins were inspired by my mother who sent me an email to remind me of the health benefits of honey (health info found at end of blog). I am excited to share this recipe with you since this is the first recipe I've come up with on my own. I decided to make muffins since all the 100% Whole Wheat Apple Muffins I baked are gone and I need a backup breakfast plan for those busy mornings.
Taste: Honey is the only sweetener used, so these muffins are lightly sweet and honey flavored. The hint of lemon zest adds another layer of flavor which compliments the honey very well. The lemon zest also makes it smell nice too!

Day after Taste: These muffins are most definitely best when it is fresh, especially when its fresh from the oven. After a day, there is an after-taste which I think is from the honey. To minimize the after-taste from the honey and to enjoy the sweetness it offers, heat the muffin in the microwave for 30 seconds or until warm. Sweetness is more noticeable when sugar is heated. By heating the muffin, the sweetness will help mask the after-taste from the honey which I consider to be slightly bitter. With that said, my husband and I did enjoy these muffins. It reminded me of corn bread except these were super moist, tender, and not crumbly like corn bread. 

Texture: They are super tender and moist. For a crunchier muffin top, when they are cooked, glaze the top of the muffin with a thin coat of honey and bake for an extra minute.

Ingredients to make 12-13 Muffins:
8.5 oz (2 cups) Whole Wheat Pastry Flour
1/4 tsp Baking Soda
3 tsp Baking Powder
4 oz (1/2 cup) Butter (soften at room temperature)
1 Egg (at room temperature)
3/4 cup milk (Any type, I used homemade soymilk)
1 tablespoon Lemon*
Lemon zest of half to one whole lemon
1/2 tsp Salt
3/4 cup Honey (Note: darker color honey is sweeter. Mine wasn't dark colored)

*Lemon can be omitted if you use buttermilk instead of milk.
Method:
1. Mix milk and lemon together. Set it aside for at least 10 minutes.
2. Prepare your muffin tins with liners or grease it. Preheat oven to 375F.
3. In a bowl, combine dry ingredients together (Flour, Baking Soda, Baking Powder, Salt).
4. In a separate bowl cream butter until lightly and fluffy. Then add the egg and mix. It is okay if the batter looks chunky.
5. Add the honey to the butter-egg mixture and mix together. It should become smooth and well blended. Then add the lemon-milk or buttermilk, and mix to combine. It is okay if it looks curdle.
6. Add the honey mixture to the dry ingredients. Mix to combine and blend the ingredients together. If your batter looks a little curdled, it is okay.
7. Fill your muffin tins 3/4 way full. I used and ice cream scoop and got 13 muffins.
8. Bake for 15-20 minutes or until a toothpick comes out clean when inserted to test for doneness.
9. Cool and enjoy, or glaze tops with a thin layer of honey and bake for an additional minute or two. Keep a close watch since honey burns easily. 

Tips:
  •  When mixing muffin batter, try not to overmix it or you'll get tough muffins
  • For those busy mornings or mornings when we just don't want to leave our warm beds, these muffins are lifesavers. Like the 100% Whole Wheat Apple Muffins these muffins freeze well. After warming them up in the microwave for 30 seconds to 1minute, it is warm, moist and delicious. 

Health Benefits of Honey:
Note: FDA does not have strict rule or check the quality of honey. Honey that is nutrient-depleted will not be as beneficial or beneficial at all
  • Helps with sore throats & coughs (especially when mixed with lemon juice)
  • Helps heal wounds from its antibacterial properties. 
  • Has been thought to fight allergies. There is no proof but many individuals utilize it as a natural allergy treatment. 
  • Increase calcium absorption
  • Provides instant energy without the sugar crash as experienced with white sugar. 
  • Buckwheat Honey helps with coughing and with sleeping difficulty. 
  • Honey can help with better blood sugar control and high cholesterol. 
  • Helps boost immunity. 
Visit these sites to learn more about honey. This is where I also obtain my information from. 
3. Livestrong

Popular Posts